Saturday, 19 December 2009

Changing folder rights and permissions in Vista

Recently I was confronted with a very peculiar problem. What actually happened was, I had set the permission of a certain folder to "Administrator" which was in D: drive. Later when I formatted my OS, I found that I practically did not own that folder, because it did not recognize the new "Administrator". So I was not able to work with any of the file within the folder. None of the video files opened, text files could not be modified, files could not be deleted or renamed, or in other words that folder had become useless.

Hence I tried a few things to change the permission of the folder as a whole, rather than an individual file, which is much easier, but really tedious to do. So I describe the process which was of particular help.

Before doing all this, its better that you disable UAC. Though the process given below can be done with UAC enabled. But it is recommended to turn UAC off so that you don't have to bear the pain of typing in the administrator password again and again.

Follow the following steps:
  • Right click on the folder you want to change the permission of.
  • Click on properties.
  • Click on Security tab.
  • Click on the "Advanced" button at the bottom right corner. "Advanced security Settings" opens up.
  • Click on the "Owner" tab.
  • Enter the name of the user, or even better will be "Administrator".
  • In case you cannot write in the space provided below "Current owner", Click on "Edit..." button.
  • Click on "Other users or groups...".
  • Now enter the user name, or "Administrator" in the space provided.
  • Click "OK".
  • Check the box which says, "Replace owner on sub-containers and objects".
  • Click "Apply".
  • Click "OK".
  • Click "OK" again in the present window.
  • You may be prompted with the message to continue, Click continue.
Even after doing all this, if you don't have control over your sub folders, it means that the rights of the sub folders are being inherited. So you need to change the "Auditing" for the particular folder.

To do so follow the following steps:
  • Right click on the folder.
  • Click on properties.
  • Click on Security tab.
  • Click on the "Advanced" button at the bottom right corner. "Advanced security Settings" opens up.
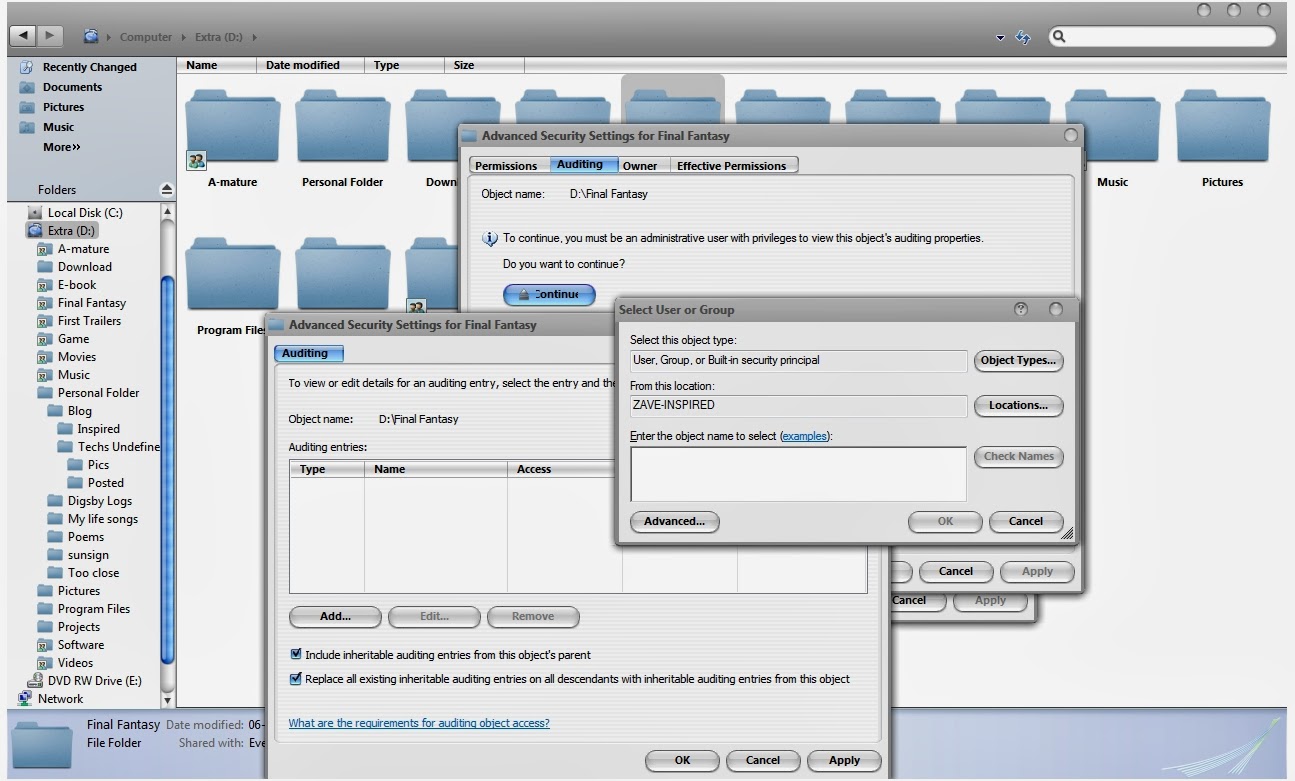
  • Click on the "Auditing" tab.
  • Click on "Continue".
  • Click on "Edit...". Another window opens up.
  • Click on "Add..." and enter the user name or "Administrator".
  • Click "OK".
  • Now, check the box saying, "Replace all existing inheritable auditing entries on all descendants with inheritable auditing entries from the object".
  • Click "Apply"->Click "OK".
  • Click "OK" again, and select continue if any pop up for permission comes in.
You have successfully changed the rights of the folder as well as the sub folders. In case you want to remove the garbage entries from the "Group or user names", simply open the "Security tab" and select them and click "Edit...", followed by "Remove".
That is it.

Enjoy!
Friday, 30 October 2009

PC Suite for LG KG200

I have a mobile, LG KG200. I had two basic requirements for a PC Suite:
  • I wanted to connect my Laptop to internet through my mobile.
  • I wanted to create a backup of my smses, since my sms memory space is quiet low.
Hence I did an extensive google search for a PC Suite for LG KG200 mobile phone for Microsoft Windows OS. I came up with two answers which were more than appropriate.

Solution 1(LG KG200 only):
The first one was the original company PC Suite for LG KG200. You can download a copy of it from here. However it satisfied only half. I was being able to connect to the internet with it, but there was no way I could transfer or create a backup of my smses.

Install:
  • Click here to download the file.
  • Unzip it with 7zip or any other archive manager.
  • Follow the instructions from the "Read Me" file.
Solution 2(Universal PC Suite MOBILedit):
The next product I got is probably the best PC Suite I've ever seen.
Features:
  • Its an universal PC Suite, called "MOBILedit!", from COMPELSON Labs, with the supporting capability of hundreds of mobiles.
  • You can check your mobile compatibilty from here.
  • Infact my mobile was not even supported, and yet it worked when I connected it through the data cable.
  • MOBILedit! is the base for many different handset related solutions such as, complete phone to phone content copy, phone settings and backups, complex phone synchronizations; download kiosk for gaming and content, professional phone management; Word document to phone converter, phone to internet configurator, and phone analyzer.
Install:
  • Click here to download the file.
  • Unzip it with 7zip or any other archive manager.
  • Follow the instructions from the "Read Me" file.
OR
  • Click here to download the latest version.

Enjoy!

Thursday, 8 October 2009

Installing Cygwin gcc manually

I've already mentioned the process of installing the Cygwin gcc compiler package directly from the internet in Microsoft Windows OS. But for those who are not able to follow it for some reason, here is a way of installing it manually, and this is a much easier process.
I have uploaded the necessary files required. So just download and install the Cygwin gcc.

The procedure:
  • Download the file from here.
  • Extract the file to any temporary folder.
  • Download the Cygwin setup file from http://www.cygwin.com/setup.exe.
  • Double click on "setup.exe".
  • If confirmation is asked, click "continue" and then click "next".
  • Check the "Install from Local Directory", then "next".
  • In "Root Directory" set the location of the Cygwin gcc installation. Recommended is "C:\Cygwin". Click "next".
  • In the "Local package Directory" set the directory of the folder you extracted. The name of the folder is "http%3a%2f%2fmirror.cs.vt.edu%2fpub%2fcygwin%2fcygwin%2f.7z". This actually is the original folder formed when the Cygwin package is downloaded from the internet.
  • This will automatically install the packages within it.
  • Click "Finish" when installation is complete.
  • You can now update the packages installed to get the latest benifits of the packages.
Setting the path for the compiler:
  • Right click on "My Computer".
  • Select "Properties".
  • The select "Advanced System settings".
  • Click on "Environment variables" at the bottom.
  • Select "Path" and click "Edit".
  • Add "C:\Cygwin\Bin”(or wherever you have located your Cygwin\bin folder) to the PATH variables list.
  • Make sure to separate it from the last path with a ";".
  • Click "Ok" and exit.

Installed packages:
  • The entire base package
  • In the development package:
  • binutils.
  • gcc core.
  • gcc g++.
  • gcc g77.
  • gcc mingw core.
  • gcc mingw g++.
  • gcc mingw g77.
  • gdb.
  • make.
  • mingw runtime.
These are the most important and sufficient packages to compile, run or debug C/C++ programs according to gcc standards.

NOTE:
This installed version of Cygwin gcc compiler can be used along with NetBeans or any other IDEs to compile programs.

Enjoy!

Wednesday, 30 September 2009

Installing Cygwin gcc in NetBeans

One of the best IDE for program or project development is NetBeans. The configurations of NetBeans for Java is much easier than C/C++. In this post I try to tell you how exactly do you install Netbeans and then configure it for use as a platform for C/C++ program development in Microsoft Windows OS. For C/C++ compiler I would use Cygwin gcc compiler.

Install NetBeans:
  • Download NetBeans from here according to your requirements.
  • Install it by double clicking on the .exe file downloaded.
Install the Cygwin gcc package:
  • Click on http://www.cygwin.com/setup.exe to download the setup file.
  • Double click on the setup file downloaded.
  • Click "Continue" in case confirmation appears.
  • Click on "Next".
  • The download has 3 options:
  • --"Install from internet (downloaded files will be kept for future reuse)".
  • --"Download without installing", simply downloads the files and you can install them later.
  • --"Install from Local Directory", in case you have the supporting files.
  • --Choose the appropriate option(recommended "Install from internet" assuming you have not downloaded the setup files) and click "next".
  • The "Root Directory" specifies the folder where the cygwin is to be installed. It is set to, "C:\cygwin", but you can change it according to your convenience.
  • Next it asks for "Local Package Directory", that is, where the files are to be stored. Choose any temporary folder.
  • Choose the connection type.
  • The package starts downloading.
  • This produces a list of download sites, choose the nearest location to get the maximum speed of download.
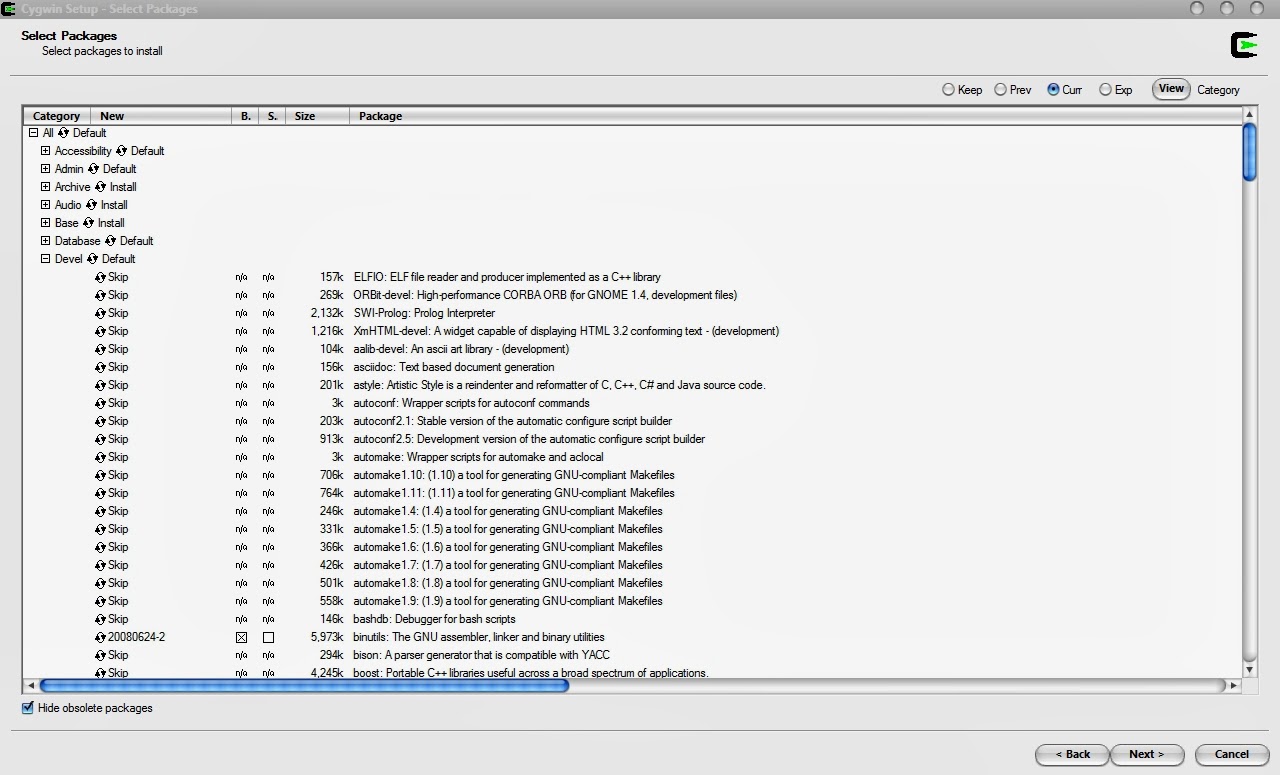
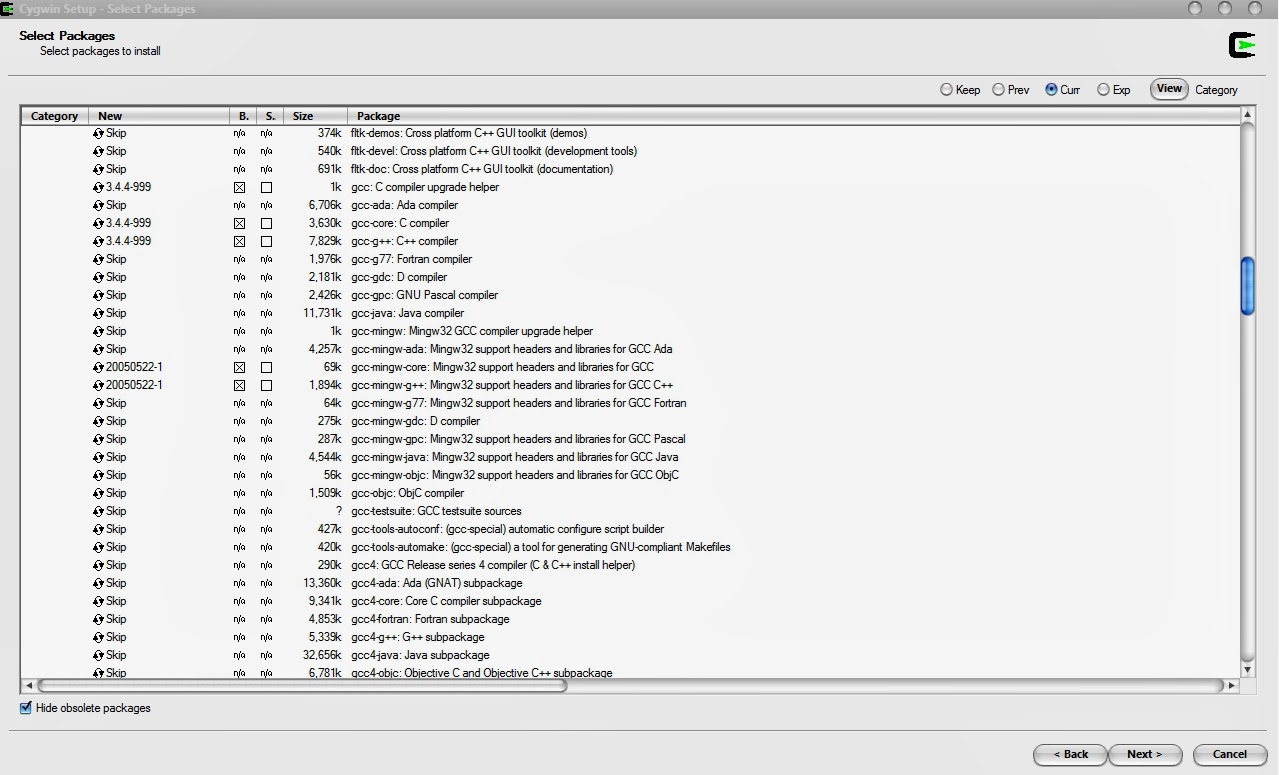
  • Next you get a list of packages which you can install, don't install the entire package, since they are not required.
  • According to NetBeans the following packages are to be installed:
  • --gcc-core - C compiler.
  • --gcc-g++ - C++ compiler.
  • --gdb - The GNU Debugger.
  • --make - the GNU version of the make utility.
  • To install click on the "refresh/default" button alongside the following packages:
  • --The "base" package. This is to install the total base package.
  • --In the "devel" package select only the following:
  • ----binutils
  • ----gcc core
  • ----gcc mingw core
  • ----gdb
  • ----make
  • ----mingw runtime
  • If there are certain default packages selected for installation do not uncheck them.
  • Click "Next". This will start downloading the packages.
  • After the packages are downloaded, click "Next" to install them.


Setting the path for the compiler:
  • Right click on "My Computer".
  • Select "Properties".
  • The select "Advanced System settings".
  • Click on "Environment variables" at the bottom.
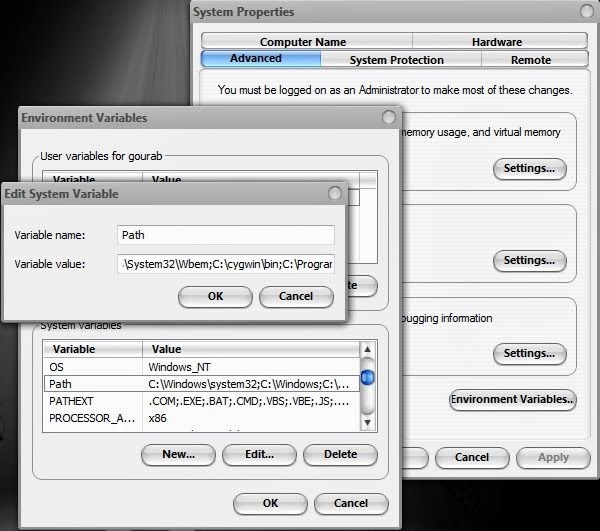
  • Select "Path" and click "Edit".
  • Add "C:\Cygwin\Bin”(or wherever you have located your Cygwin\bin folder) to the PATH variables list.
  • Make sure to separate it from the last path with a ";".
  • Click "Ok" and exit.

That is all.

NOTE:
The Cygwin gcc compiler installed can be used with any other IDEs or such other software which support manual addition of C/C++ compilers.

Enjoy!

Sunday, 27 September 2009

Locking folders with My Lockbox

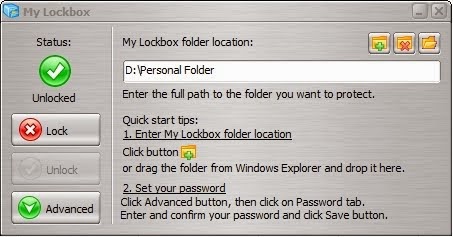
I've tried many software for locking personal folders with a password in Microsoft Windows OS. One of the best I've found is, "My lockbox". Its simple, small and most importantly free. This is a light software, with not too many complications. So you can install it and forget about it. Moreover, when you close the lockbox or exit it from the tray, the locked folder gets locked automatically.

To install:
  • Download the setup from here.
  • Install "My Lockbox" with the setup file downloaded.
  • Enter a suitable password and setup the folder location.
  • To add a folder to lock, click on "Enter My Lockbox folder location".
  • Select the folder you want to hide or lock.
  • It is recommended that you have a separate folder to keep all your personal folders, since this software can lock only a single folder at a time, which may have sub-folders or files.

Enjoy!

Saturday, 26 September 2009

Changing image size in blog posts

I had earlier tried to upload pictures from my laptop directly to the blogger page, http://zave-tech.blogspot.com/ using Blogger Uploader.

But there were a lot of disadvantages:
  • Irrespective of the size of the image uploaded, it always appeared with a pixel size of 400 X 250.
  • The image did not fill the width of the page, and was hence not very clear.
  • The image was actually reduced in quality to 400 X 250 pixels. So even if I tried to increase the dimensions, it only blured the image, rendering it unreadable.
  • The main image that I had uploaded would be stored in Picasa web album along with its compressed image as well.
  • Like the one given below is a 1280 X 800 image, but it appears like this without any change.

Hence I was bent on finding a solution to it. But I got options of using other photo sharing sites, which I did not want, because I love Picasa. So after trying out many things I got a way by which I could prevent blogger from compressing the image, and increase the dimension of the image according to my needs.

Steps:
  • Upload the image by clicking on the "Add image" button provided at the tool bar of the blogger post. Select the image from your computer and select the layout, in image size, choose "Large". Now click "Upload".
  • After you have uploaded the image using the standard blogger image uploader, go to the "Edit HTML" section of the "edit post".
  • Search the code of the image uploaded(generally found at the begining).
  • Now search for three things in the code:
  • --width: 400px; height: 250px;
  • --s400. This is written in the second image url under src="http:..." and before the image name, like "Vista+Desktop.jpeg"
  • Now replace the bold element "s400" with "s1600" to use the original image
  • The width and height depends on your use.
  • I prefer putting a "target="_blank"" after the a href="http:...", so that the image opens in a new page incase the user clicks on that.
  • One more advantage of this is that, only your original image is stored in Picasa web album and not the compressed one too.
  • The previous image is now displayed as below.

Enjoy!

RipBot - Convert videos to mkv, mp4 or avchd

The RipBot is a video converter which converts nearly any video format into mkv or mp4 or avchd format in Microsoft Windows OS. So that you can save your videos and movies with the same quality but use less space on your hard disk.

To install:

  • Download RipBot from here or from the author's site.
  • RipBot is not required to be installed, it is to be used directly by double clicking the RipBot.exe file. Just extract the .7z file in the appropriate location.
  • There are 4 codecs which are essential to ensure that RipBot executes, theses are:
  • --"AviSynth" - Open source frame server. http://avisynth.org/
  • --"FFDshow"(32 bit) - Open source Versatile Audio and Video decoder. http://www.ffdshow.info/
  • --"Haali media splitter" - Adds support for .mkv, .mp4, .ts, .ogm in Windows. http://haali.net/mkv/
  • --"Java" - Runtime environment. http://java.com/
  • Take care you install the correct version, or the latest version of the codecs. After you make sure that you have the above four installed in your OS, double click on "RipBot264.exe" to start the converter.
  • You can choose two options of converting it into .mkv or .mp4 format.


To use:
  • Click on "Add" to add the media file.
  • Click on the "..." button to browse the video file.
  • Click "Open" after you have chosen the file.
  • Choose the correct option for your conversion "mp4" or "mkv" or "avchd".
  • Click "Done" to add the file for conversion.
  • You can add more files to the list by clicking on the "Add" button and following the above steps.
  • When you have added all the files required, click on "start" to convert.
  • The converted files are stored in the default location "C:\Users\user_name\desktop\". But you can change it as well.
Enjoy!