Wednesday, 30 September 2009

Installing Cygwin gcc in NetBeans

One of the best IDE for program or project development is NetBeans. The configurations of NetBeans for Java is much easier than C/C++. In this post I try to tell you how exactly do you install Netbeans and then configure it for use as a platform for C/C++ program development in Microsoft Windows OS. For C/C++ compiler I would use Cygwin gcc compiler.

Install NetBeans:
  • Download NetBeans from here according to your requirements.
  • Install it by double clicking on the .exe file downloaded.
Install the Cygwin gcc package:
  • Click on http://www.cygwin.com/setup.exe to download the setup file.
  • Double click on the setup file downloaded.
  • Click "Continue" in case confirmation appears.
  • Click on "Next".
  • The download has 3 options:
  • --"Install from internet (downloaded files will be kept for future reuse)".
  • --"Download without installing", simply downloads the files and you can install them later.
  • --"Install from Local Directory", in case you have the supporting files.
  • --Choose the appropriate option(recommended "Install from internet" assuming you have not downloaded the setup files) and click "next".
  • The "Root Directory" specifies the folder where the cygwin is to be installed. It is set to, "C:\cygwin", but you can change it according to your convenience.
  • Next it asks for "Local Package Directory", that is, where the files are to be stored. Choose any temporary folder.
  • Choose the connection type.
  • The package starts downloading.
  • This produces a list of download sites, choose the nearest location to get the maximum speed of download.
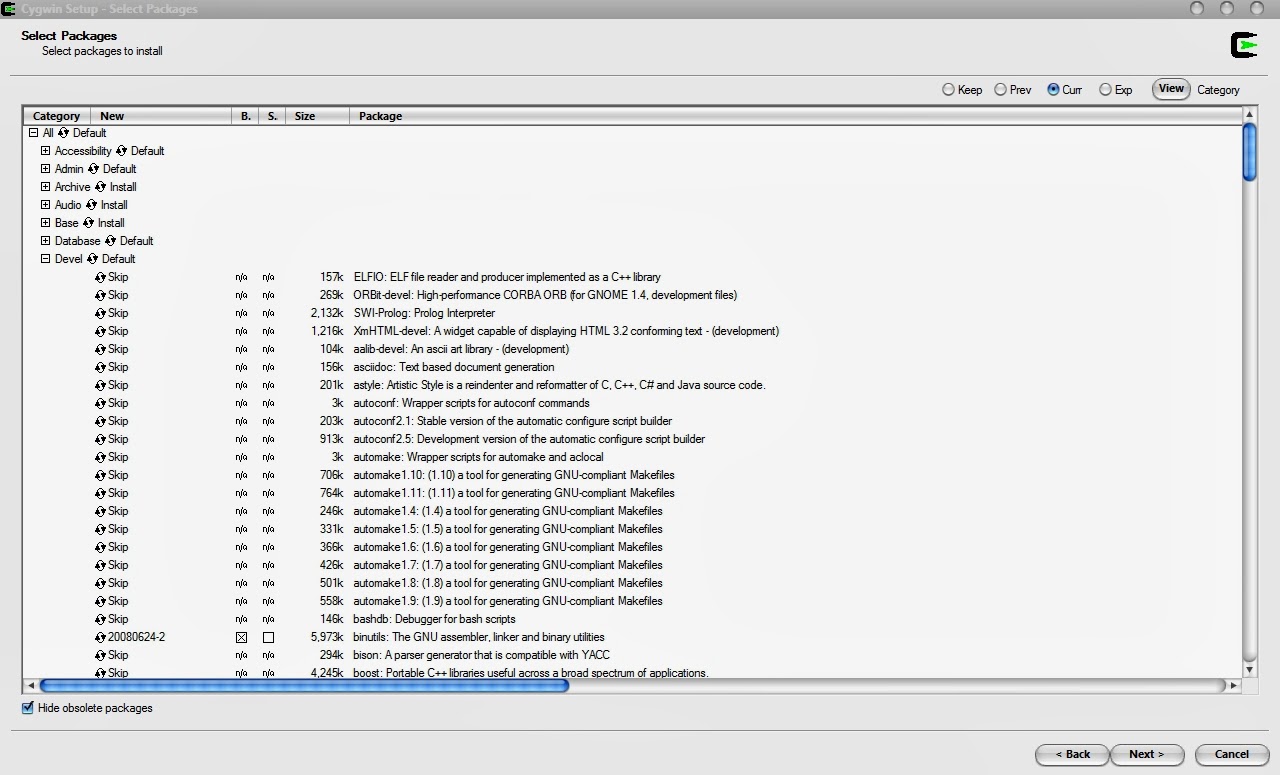
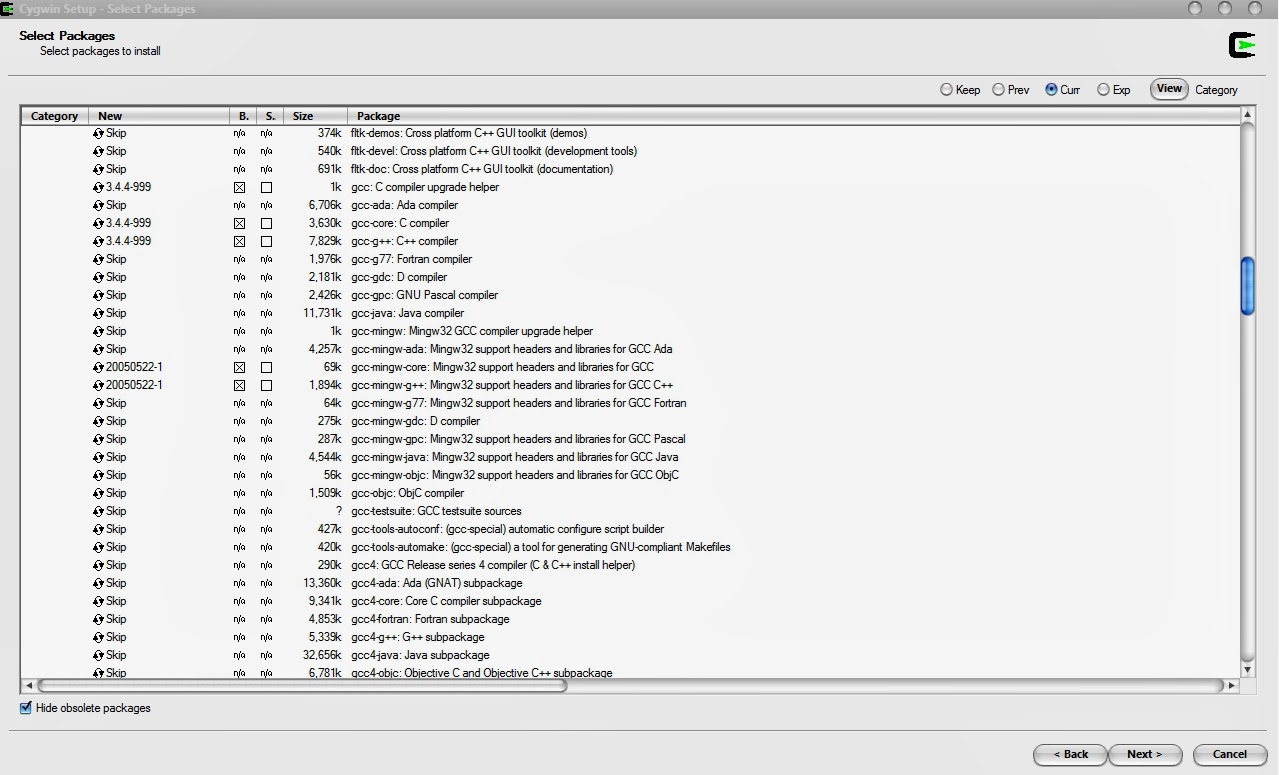
  • Next you get a list of packages which you can install, don't install the entire package, since they are not required.
  • According to NetBeans the following packages are to be installed:
  • --gcc-core - C compiler.
  • --gcc-g++ - C++ compiler.
  • --gdb - The GNU Debugger.
  • --make - the GNU version of the make utility.
  • To install click on the "refresh/default" button alongside the following packages:
  • --The "base" package. This is to install the total base package.
  • --In the "devel" package select only the following:
  • ----binutils
  • ----gcc core
  • ----gcc mingw core
  • ----gdb
  • ----make
  • ----mingw runtime
  • If there are certain default packages selected for installation do not uncheck them.
  • Click "Next". This will start downloading the packages.
  • After the packages are downloaded, click "Next" to install them.


Setting the path for the compiler:
  • Right click on "My Computer".
  • Select "Properties".
  • The select "Advanced System settings".
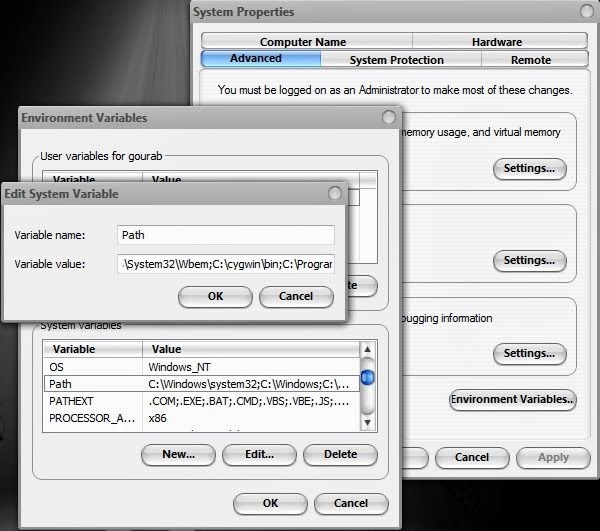
  • Click on "Environment variables" at the bottom.
  • Select "Path" and click "Edit".
  • Add "C:\Cygwin\Bin”(or wherever you have located your Cygwin\bin folder) to the PATH variables list.
  • Make sure to separate it from the last path with a ";".
  • Click "Ok" and exit.

That is all.

NOTE:
The Cygwin gcc compiler installed can be used with any other IDEs or such other software which support manual addition of C/C++ compilers.

Enjoy!
Sunday, 27 September 2009

Locking folders with My Lockbox

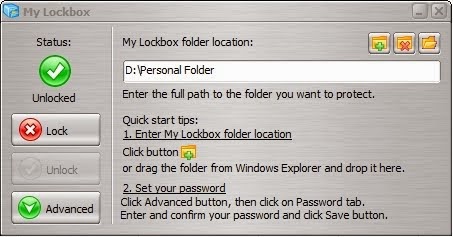
I've tried many software for locking personal folders with a password in Microsoft Windows OS. One of the best I've found is, "My lockbox". Its simple, small and most importantly free. This is a light software, with not too many complications. So you can install it and forget about it. Moreover, when you close the lockbox or exit it from the tray, the locked folder gets locked automatically.

To install:
  • Download the setup from here.
  • Install "My Lockbox" with the setup file downloaded.
  • Enter a suitable password and setup the folder location.
  • To add a folder to lock, click on "Enter My Lockbox folder location".
  • Select the folder you want to hide or lock.
  • It is recommended that you have a separate folder to keep all your personal folders, since this software can lock only a single folder at a time, which may have sub-folders or files.

Enjoy!

Saturday, 26 September 2009

Changing image size in blog posts

I had earlier tried to upload pictures from my laptop directly to the blogger page, http://zave-tech.blogspot.com/ using Blogger Uploader.

But there were a lot of disadvantages:
  • Irrespective of the size of the image uploaded, it always appeared with a pixel size of 400 X 250.
  • The image did not fill the width of the page, and was hence not very clear.
  • The image was actually reduced in quality to 400 X 250 pixels. So even if I tried to increase the dimensions, it only blured the image, rendering it unreadable.
  • The main image that I had uploaded would be stored in Picasa web album along with its compressed image as well.
  • Like the one given below is a 1280 X 800 image, but it appears like this without any change.

Hence I was bent on finding a solution to it. But I got options of using other photo sharing sites, which I did not want, because I love Picasa. So after trying out many things I got a way by which I could prevent blogger from compressing the image, and increase the dimension of the image according to my needs.

Steps:
  • Upload the image by clicking on the "Add image" button provided at the tool bar of the blogger post. Select the image from your computer and select the layout, in image size, choose "Large". Now click "Upload".
  • After you have uploaded the image using the standard blogger image uploader, go to the "Edit HTML" section of the "edit post".
  • Search the code of the image uploaded(generally found at the begining).
  • Now search for three things in the code:
  • --width: 400px; height: 250px;
  • --s400. This is written in the second image url under src="http:..." and before the image name, like "Vista+Desktop.jpeg"
  • Now replace the bold element "s400" with "s1600" to use the original image
  • The width and height depends on your use.
  • I prefer putting a "target="_blank"" after the a href="http:...", so that the image opens in a new page incase the user clicks on that.
  • One more advantage of this is that, only your original image is stored in Picasa web album and not the compressed one too.
  • The previous image is now displayed as below.

Enjoy!

RipBot - Convert videos to mkv, mp4 or avchd

The RipBot is a video converter which converts nearly any video format into mkv or mp4 or avchd format in Microsoft Windows OS. So that you can save your videos and movies with the same quality but use less space on your hard disk.

To install:

  • Download RipBot from here or from the author's site.
  • RipBot is not required to be installed, it is to be used directly by double clicking the RipBot.exe file. Just extract the .7z file in the appropriate location.
  • There are 4 codecs which are essential to ensure that RipBot executes, theses are:
  • --"AviSynth" - Open source frame server. http://avisynth.org/
  • --"FFDshow"(32 bit) - Open source Versatile Audio and Video decoder. http://www.ffdshow.info/
  • --"Haali media splitter" - Adds support for .mkv, .mp4, .ts, .ogm in Windows. http://haali.net/mkv/
  • --"Java" - Runtime environment. http://java.com/
  • Take care you install the correct version, or the latest version of the codecs. After you make sure that you have the above four installed in your OS, double click on "RipBot264.exe" to start the converter.
  • You can choose two options of converting it into .mkv or .mp4 format.


To use:
  • Click on "Add" to add the media file.
  • Click on the "..." button to browse the video file.
  • Click "Open" after you have chosen the file.
  • Choose the correct option for your conversion "mp4" or "mkv" or "avchd".
  • Click "Done" to add the file for conversion.
  • You can add more files to the list by clicking on the "Add" button and following the above steps.
  • When you have added all the files required, click on "start" to convert.
  • The converted files are stored in the default location "C:\Users\user_name\desktop\". But you can change it as well.
Enjoy!

Thursday, 24 September 2009

MiniLyrics plugin for media players

I love music and so do I love to hear the lyrics as well, but sometimes its not that clear, hence, for many days I was searching for a lyrics plugin which could display the lyrics and I might say, I've got one of the best available because of its features in Microsoft Windows OS. Its called "MiniLyrics". I hope some of you have heard about it. Those who have not tried it, its time to expect the unexpected.

Features:
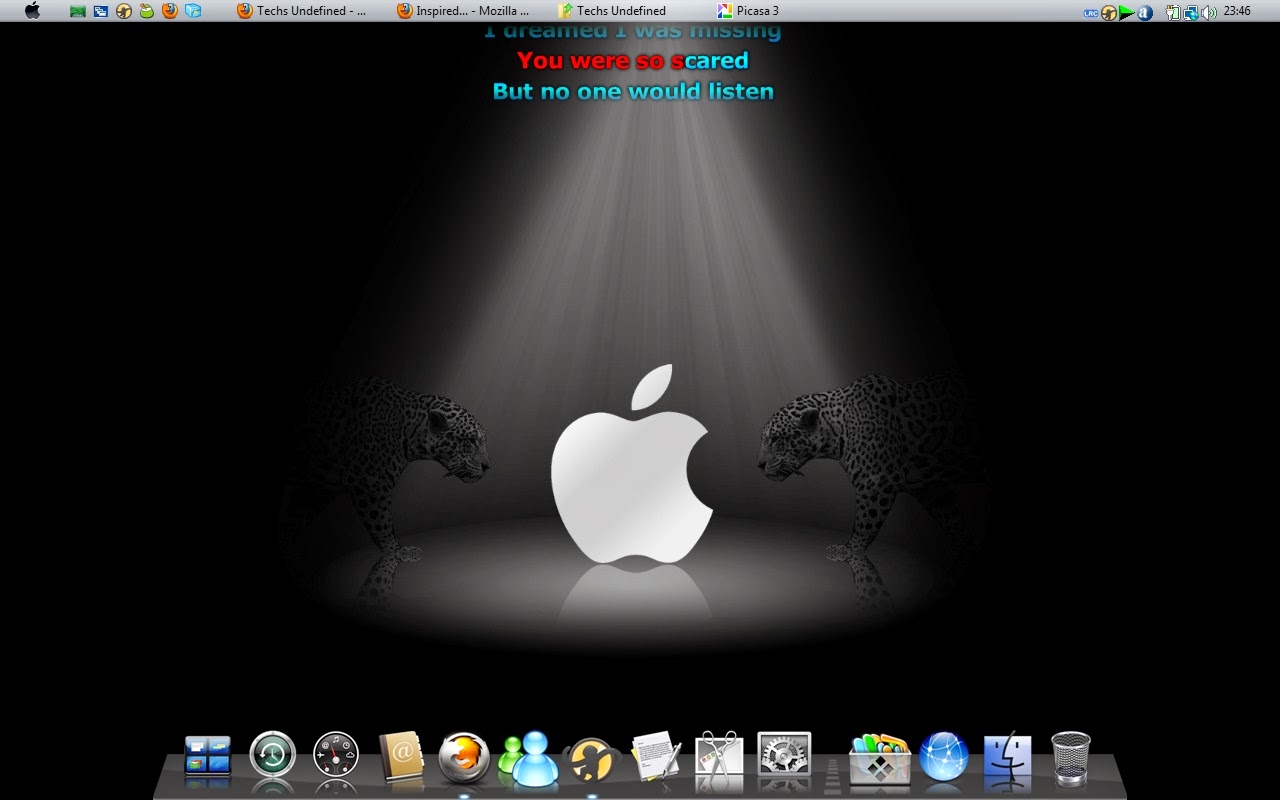
  • Karoke display of lyrics where ever you want.
  • Mouse click through feature, which means you can click anything that is displayed below the lyrics display.
  • Automatic download of lyrics, and it will ask you if it is in a conflicting position, which is rather rare.
  • Storing of lyrics where ever you want so that you need not be connected to the internet always.
  • Compatible with 21 players including Winamp, Windows Media Player, Apple iTunes, Real Player, VLC Media Player and MediaMonkey.


Download and installing:
You can download MiniLyrics from here or from any software sharing site. Install MiniLyrics after you have installed the music player you want to use it with. While installing select the player which you want to use MiniLyrics in. The path is generally set, but in case it is not you can set it.

Setting up the directory to save the lyrics:
  • Right click on the Minilyrics icon in the tray and choose "Prefrences".
  • Select "Lyrics Download" under the "Lyrics" heading.
  • Make sure:
  • --"Auto download lyrics" is checked.
  • --"Pop up lyrics searching dialog when lyrics are found" is checked.
  • --"Do not download txt lyrics file automatically" is checked, because the txt files provide a static display of lyrics.
  • --It is recommended "Rename the downloaded lyrics file name, as the same name as the song" is checked, because it provides easy manual access and use of the lyrics.
You would want to save the lyrics for future use, in case you want it to reuse later or for others to use it. There are three options to save the lyrics:
  • To save it any folder that you want, check the "Save lyrics in:". Then set the directory of your choice.
  • To save the lyrics in the respective directory where the songs are stored, check the "Save lyrics in the song's directory". This is recommended in case you want others to use it as well, or to ensure the lyrics is deleted when you delete the song and not otherwise.
  • To save the lyrics in the mp3 file itself, check the "Save lyrics in mp3 file". This is recommended only if you have the selected players which support this feature like, Windows Media player, iTunes etc.
Setting the display of the MiniLyrics icon:
  • Click on the "Tray Icons" under the "System" header.
  • Select the appropriate display according to your use. You can hide it from the task bar and keep it in as a tray icon only or you can do both. By default both are enabled.
Setting the display of the lyrics:
  • Select "Lyrics Display" under the "Themes" header.
  • Change the Font style, Font style, Font colour according to your choice.
  • Change the Display style. Recommended is "Vertical scrolling" and "Karaoke". But the ultimate choice is yours.
  • When you have made the necessary settings, click "Close". This automatically saves all your settings.
Enable floating lyrics:
  • Right click on the MiniLyrics icon.
  • In case you are using floating lyrics, select only "Floating Lyrics".
  • Click and hold and then drag the floating lyrics where ever you want it to be displayed according to your convenience.
  • Select "Display options" and click on the "Mouse Click Through". This enables you to let the lyrics being displayed where you want to be and click through it.
Editing lyrics:
  • You can edit the lyrics being displayed.
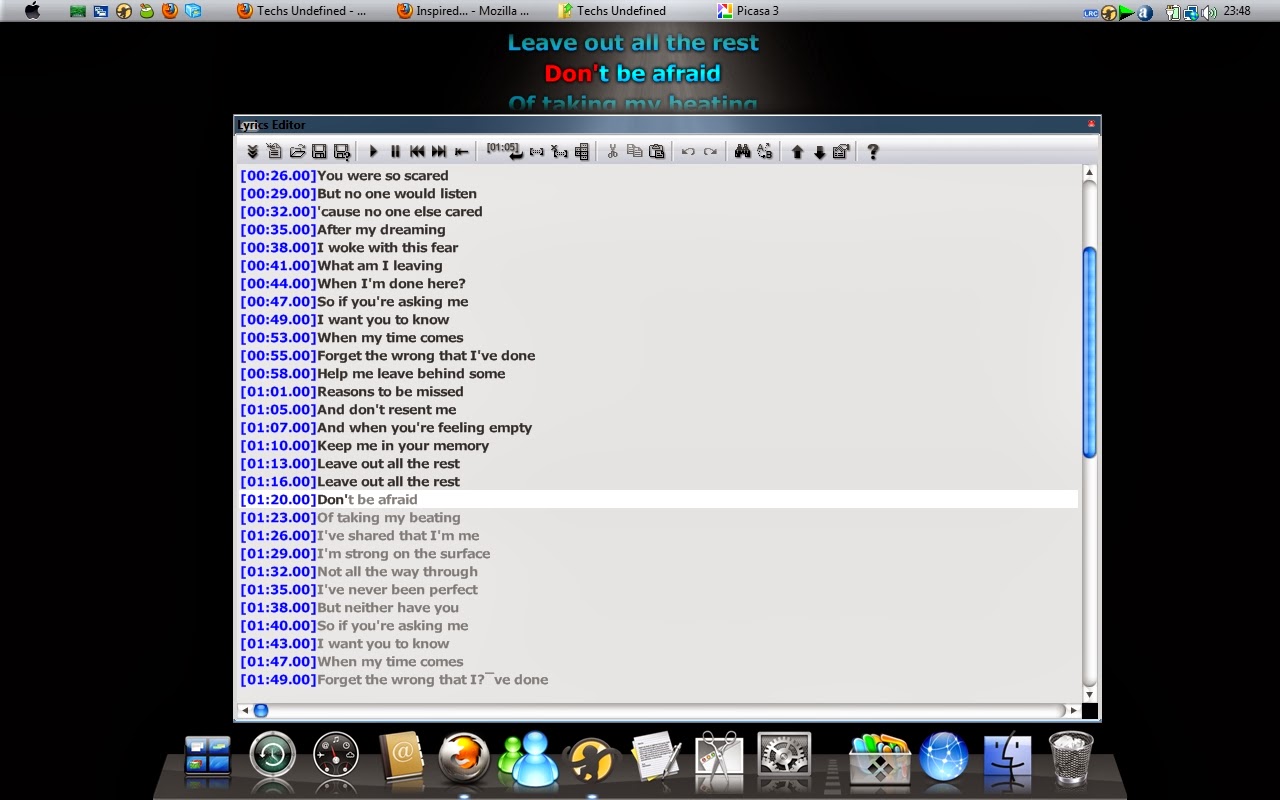
  • Right click on the icon of MiniLyrics and select "Lyrics Editor...".
  • Make any changes that you want to.
  • Don't save it, just close the editor. After the song finishes playing there will be pop up asking if you want to save the changes.
  • Click yes, and it is recommended that you check "Don't ask again", so that you are not asked each time you make a change in the lyrics and they are automatically saved.


Synchronising the display of lyrics with the song:
  • Right click on the icon of MiniLyrics and select "Lyrics Editor".
  • Look at the 4th and 3rd icon from last in the tool icons.
  • The 4th last icon takes the lyrics backward by 0.5secs and the next icon takes the lyrics forward by 0.5secs.
  • Keep clicking on the icons till you find that the lyrics is synchronised.

NOTE:

The options in the "Preferences" can be a bit different, depending on the version of MiniLyrics you have installed, so try to use the latest.

Enjoy!

Advanced sharing in Windows Vista

In our college I face a lot of problem accessing the folders shared by someone using vista . The problem is that to access the shared file I am asked a user name and password. And I'm tired of telling each and everyone the process to remove it. This can be done in the following way.

To remove this and some other recommended settings:
  • Right click on the network icon and select "Network and Sharing Center".
  • Click on the down arrow beside the "Password protected sharing".
  • Check "Turn off password protected sharing". Click "Apply".
  • Turn off "Public folder sharing", "Printer sharing" and "Media sharing"(sharing by Windows Media Player), if they are not required, in the same way as the above step.
If while accessing the shared folder it still asks for a password, or the folders simply don't open, that means your "Guest" login is not enabled while sharing. In order to correct it (i.e. enable guest login):
  • Right click on the folder U want to share.
  • Choose properties & click on the sharing portion.
  • Click on the "Change sharing permissions" button.
  • You will get a list of user name on your OS or the name by which you are logged on. Above it there is a space for entering a new user.
  • Click on the arrow pointing down. Among a list of users click on the "Guest" or "Everyone" option and press the “Add” button.
  • If you do not want the others to change the content of your folder keep the rights of the guest as “Reader”, else you can change it according to your need.
In case the "Share..." button in the "Sharing properties" is not highlighted or non-clickable:
  • Click on the “Advanced Sharing” button.
  • Now, check the box for “Share this folder”.
  • Click on the "Permissions" button to set the permission of the sharing.
  • In case "Everyone" is not in the list of "Group or user names", click on "Add..." and add "Everyone" in the dialog box.
  • Click "OK".
  • In the "Permissions for Everyone" header check the box "Read" and not the others. This will provide only read facility to others, rather than give modify capabilities as well.
  • Select "Apply", then “Ok”.
Enjoy!

Dell Inspiron 1525

I couldn't decide what my first post should be. Then I thought, why not tell about the thing from which it all began.
My first laptop, DELL Inspiron 1525 (Ruby Red).

Configuration:
  • Processor – Intel(R) Core(TM) 2 Duo Processor T5750 ( 2.0 GHz, 2 MB Cache, 667 MHz FSB).
  • RAM – 3 GB (1*2 GB + 1*1 GB) 667 MHz Dual Channel DDR 2 CDRAM.
  • Hard Disk – 250 GB SATA Hard Drive.
  • Screen – 15.4″ Widescreen WXGA (1280*800) TFT Display with Truelife(TM).
  • Graphics – Intel(R) Integrated Graphis Media Accelerator X3.
  • Ethernet – Intel(R) PRO/Wireless 3945 Dual Band 802.11a/g 54 Mbps Wireless Mini Sound.
  • Bluetooth – DELL(TM) Wireless 355 Bluetooth Module.
  • Operating System – Genuine Windows Vista(TM) Home Premium with AERO technology.
(NOTE :: Also if any one wants to install Linux the warranty for one or four years which ever you opted for still holds good. But if there is any problem with the hardware then the customer care will ask you to load Vista for any change being made through the software. So go for any OS. I myself have both Vista and Fedora 10 (earlier had Vista and Ubuntu 8.04) loaded in my laptop and it works fine).
  • Security – McAfee(R) Security Center(TM)-15 Months OEM.
  • Others – 6-Lithium Battery,65 W AC adapter,Keyboard with touch pad,Travel Remote Control.
Other assets:
  • A 1 year full warranty(you can also get a +3 years accidental warranty which includes replacement of parts if damaged due to some tea spills on keyboard or dropping from hand etc., but not for national calamities).
  • A set of touch panel with the traditional buttons(Play/Pause,Stop,Previous,Next,Mute,Volume high or low).
  • Then the best feature that I found was the “DELL Media Direct” button which allows me to access all the movies,videos,music,pics,play DVDs and that too without the startup of your OS, only I have to press the button of “DELL Media Direct” given above the keypad.
  • Talking about the graphics.. its fine & with AERO I can fell a bit close to 3D, though not even a bit close as compared to a linux user.
  • The OS has at times given problems but it was mainly due to a software I had installed. So not to worry on that front.
Problems:
  • The sound is not very loud though the quality is excellent.
  • The colour of the keypad is silver-gray , it would have been better if it was black.
  • The mouse touch pad is not of very high quality.
  • If you are a gamer, you would probably not go in for this due to its lack of graphics card. Though a video memory of 359MB is not bad for games with low end video requirements(where minimum requirements is 128MB or so).
Queries:

A query which I had before the purchase of DELL and which most of us have with DELL is the presence of service center. Not to worry! DELL has a toll free number for the working hours and you can contact it to get the support you want regarding the software or hardware problem or query. If by chance any part goes wrong you just have to contact them. They will suggests you steps like hardware diagnosis and if the problem remains, they will send engineers to set whats wrong. Just imagine you don’t have to walk a single step yourself.

So one should definitely go for it since its a value for your money. I might have left out something so please bear with me.

Here are the screen shots of my Vista and Fedora desktop.
Enjoy!